Showing posts with label 3D. Show all posts

FingerFood's Theme Buffet - Week 4 - Sparkle!

 Hi guys, I'm back today with the 4th week of FingerFood's Theme Buffet, and the prompt for today is Sparkle!  I actually didn't finish this mani until this morning, I think this is the latest I have ever left a challenge mani since I started blogging :D


 I didn't exactly plan to do such a girly mani today, but I really wanted to use W7 - Pink Mirror that I picked up a few days ago, so I just went with it.  I am really loving this polish, it's just as pretty as I hoped it would be.                                                                                                                                       
I used 1 coat of Jess - Party Girl from Poundland over Pink Mirror, and then stamped with Barry M Silver Foil and MoYou Princess 13.  The accent nail is Rimmel Space Dust - Shooting Star and a holographic heart stud from this wheel.
This is the first time I have used this texture, and I am really liking it.  Looking forward to using it for a whole mani :)
I'd love to know what you guys think of this mani, and don't forget to check out everyone else's sparkly submissions via the thumbnails below - I have seen some really gorgeous mani's already today.


FingerFood's Theme Buffet - Week 2 - Shapes/Geometric & Winterberry Nail Art - Part 4

*Some products in this post were discounted in exchange for review.
 Hi guys, today I'm back with another dual-purpose post today, with a mani for the FingerFood's Theme Weeks, that uses another item from Winterberry Nail Art.  The prompt for today is Shapes/Geometric, so I have used the triangle gems to do a diamonds accent nail.  They were easy to use, and I really like how small they are, I don't think anyone will struggle to fit a few of these on their nails.  I used 1 coat of Gelous under my SV, and trust me, they weren't going anywhere!


 The base for this mani is a gradient of Color Club - Miss Robinson and Raspberry Rush.  Both of these polishes are extremely neon, and even with my daylight bulb, I had to do a little bit of tweaking with the photos afterwards. The purple is a little more pink leaning in real life, the photo above with the bottle is the closest.
The glitter I used was Golden Rose - Jolly Jewels #118.  I was tempted to grab L'Oreal - Confetti from my untried rack, but I think the silver glitter in this B&W topper lends itself to this mani even better, so I resisted the temptation.
I was having a pretty miserable day when I painted this, and it cheered me up so much having this on the ends of my fingers.  It's so bright and happy I couldn't stay miserable :)  Does neon polish have that effect on anyone else?

Don't forget, I have a discount code for Winterberry Nail Art to share with you lovely people.  Use the code PEPIPO15 at the checkout for 15% off all items when you spend £2 or more.  Valid until the end of January.


Winterberry Nail Art: Part 3

 *Some products in this post were discounted in exchange for review.
 Hi guys, this post was actually supposed to be up last night, but I didn't get a chance to type it up in the end, so I will be double posting today instead.  This first post is another item from Winterberry Nail Art - the 3D gunmetal skull charms. 


The base for this mani is a polish I have had in my stash for ages, but never really use - L'Oreal Jet-Set - Boogie, and the skulls image is from MoYou London - Biker 10, stamped with Barry M Silver Foil.
The glitter is 2 coats of Gunmetal Glitter by La Femme Beauty, and this is the first time I have actually worn this.  I'm really impressed with this glitter, for such a cheap polish, the tiny details are awesome.  Check out the macro shot below, those tiny green specks are in fact, itsy bitsy little bars!
I got very excited when I noticed that, I didn't even know they made bar glitter that small! I think it's bloody adorable :)
This charm has a fairly flat back, but is not hollow like the leopard charm was, so you have a larger area to put the glue on.  I did this mani late at night, and whilst I did use nail glue this time, I think I may have been a little impatient, and stuck it on before the polish was completely dry as it did come off in the morning.  I glued it straight back on though, and it held up fine throughout the rest of the day.  It's probably worth mentioning that I do have quite small and curved nails, so a lot of this charm was not actually touching the nail to begin with.  If your nails are wider or flatter than mine, or even if you were to use it on your thumb, you would probably have a little less trouble than me.
I think you guys already know, but I adored this mani.  How could I not - it's black polish, glitter and skulls.  Doesn't get much better in my opinion! 
I'd love to know what you guys think though, I know it's not every body's cup of tea, but how about those tiny green bars?  Did they make you go 'awwwww'?

Don't forget, I have a discount code to share with you guys :)  Use the code PEPIPO15 at the checkout for 15% off all items, including sale items if you spend £2 or more.


Winterberry Nail Art Part 2 & FingerFoods Theme Buffet - Week 1 - Animal Print

Hi guys, today I have somewhat of a double duty post for you, hence the ridiculously long title.  I recently decided to join in FingerFood's Theme Buffet, which is a relaxed weekly challenge that takes place on Sunday's, hosted by the lovely Sam from FingerFood.  The first prompt is animal print, which seemed like a perfect time to review another item from Winterberry Nail Art.
p.s. there's a discount code at the bottom :)


  If you saw the first post where I showed you the whole order, you may have already guessed, but today I am using the leopard head charms.  The base for this mani is Shimmer Polish - Candace (swatches coming soon), with W7 - Gold Mirror undies, and Sinful Colors - Black on Black on the accent nail.  I drew the leopard print with my Barry M Nail Art Pen, which is really good by the way.  The paint flows nicely and is easy to control.  I didn't have to re-do any nails or even go over a single spot for opacity, and this is the first time I have used any brand of nail art pen, so it gets a big thumbs-up from me.
I attatched the charm with regular top coat, but I would advise using nail glue if you want it to last more than an hour or 2.  I wore this for a couple of hours without losing them, but I wanted to be able to remove it quickly and easily, as I did this at the weekend when I had a bunch of untrieds calling to be worn!  The charm itself is hollow at the back, but it is still a little bit weighty.  It wasn't too bad, but as I'm not that used to 3D nail art I was aware that there was a little extra weight on that finger.  And at least I'd notice if it came off though :)  It just about fits my ring finger, but I do have very small hands and nails, so I imagine it would fit most people.  The back also has a slight curve to it, to help it adhere to the nail better, which is a nice feature.
I wasn't 100% sure if I was going to mattify this or not when I started it, but it seemed a little too busy whilst glossy, even for my taste.  I do have a couple of glossy pictures though, so I'll let you guys decide for yourselves.  When it came to mattifying this design, I did have to apply the top coat really carefully around the charm, but it wasn't too hard :)

Anyway, as always, I would love to hear your thoughts on this design, matte or glossy?  Also, what do you think of 3D nail art in general, do you wear it yourself, like it on others only, or not like it at all?

*Rachel has kindly given me a discount code to share with you guys :)  Use the code PEPIPO15 at the checkout for 15% off all items, including sale items.  


Don't forget to check out the other ladies who are chowing down on some animal print today, via the thumbnail below :)


Guest Post at The Crumpet

Hi guys, sorry for going AWOL for the last few days, I've had a really crappy week, and just needed a few days to get myself sorted. I should be back to a normal schedule by the weekend. :)  I have some really exciting news to share with you today though! I have the honour of appearing in a guest post on The Crumpet today :D  I can hardly believe it myself.  I would love if you guys could go and check it out here.


Tell Me About It, Stud!

 Hi guys, just a quick post today to show you some awesome studs I picked up from ebay a couple of weeks ago, hence the title.  This seller has a few other varieties, and I have been back since and bought more so I'll show you them when I receive them.  The seller did accidentally send me the wrong item, they sent some gold and silver foils, but after contacting them, they have refunded my money, and let me keep the foils.  Shipping from Hong Kong took under 2 weeks, they use Standard Delivery rather than Economy like most HK sellers on ebay.
These are the studs from the smaller wheel, and as you can see they're all holographic bar one, which is more duochrome than holographic.  I used the pink heart studs in this mani recently, and I can't wait to use the others!   This wheel was £1.25 here with free shipping.

 These are the studs from the larger wheel, and these are a lot bigger - they're 0.6cm x 0.6cm. 
Sorry the picture's a little blurry, I had nothing to rest my arm on whilst taking this; you should have seen the state of some of the other photos : D
I've never seen studs like these before, but I'm looking forward to using them, I think they're really cool!  This wheel cost me £1.88 here with free shipping.

I am definitely getting some more from that listing.  They have loads of neon studs on it too, and the spiky conical studs that are completely impractical, but so freakin awesome!  (Can you tell I bought some)

#33DC - Day 24 - mani with the colour you own the most of.

 
 Hi guys, I'm back for Day 24 of the #33DC challenge, and the prompt for today is to do a mani with the colour I own the most of.  I thought this would mean a purple mani, but after a quick look on my polish spreadsheet, I have 41 purples, and 49 pinks.  I think this is largely because at the beginning of my polish obsession, I bought a few massive bundles of polish from ebay which included a lot of pinks.


I didn't really have a plan for this mani, I just knew that I wanted to test Revlon - Cupid for stamping, but I wanted to do some freehand too.  I started with a base of Sally Hansen Complete Salon Manicure - Lavender Cloud, then added the stripes with Cupid and P.I.A - Shade 12.  Then I stamped the rose design from MoYou Mother Nature 05 and the same 2 polishes.  This is the second time I've used this image, sorry guys!  I will use the other plates too, I promise, it just seemed to fit so well with this mani : )
 The day I did this mani, I had received some really cool studs I bought from ebay, including some gorgeous holographic hearts, so I had to add a few of them into this mani.  I will do a little post showing you these studs and the other ones I bought sometime in the next few days. I think these were the perfect touch, that was my favourite nail by far.  They are a lot more holo in real life, but it was hard to capture on camera.
The next prompt is a new technique for you.  I haven't done the mani yet, but will be trying some things over the weekend.  Wish me luck!


#33DC - Day 21 - Europe (Black Sand Beach, Vík í Mýrdal, Iceland)

 Hiya guys!  I'm back for Day 21 of the #33DC and the prompt for today is Europe.  I was unsure on what I wanted to do for this prompt for ages, but once I got this idea in my head I was determined to see it through.


Photo credit: Alexandre Deschaume
 This is a photo of the stunning black sand beach VĂ­k Ă­ MĂ˝rdal, Iceland in a thick fog.  I came across this photo here on photo.net, and was just blown away by it.  I was pretty nervous about trying to recreate this, but I had a few back-up ideas in case it was a miserable fail so no pressure.

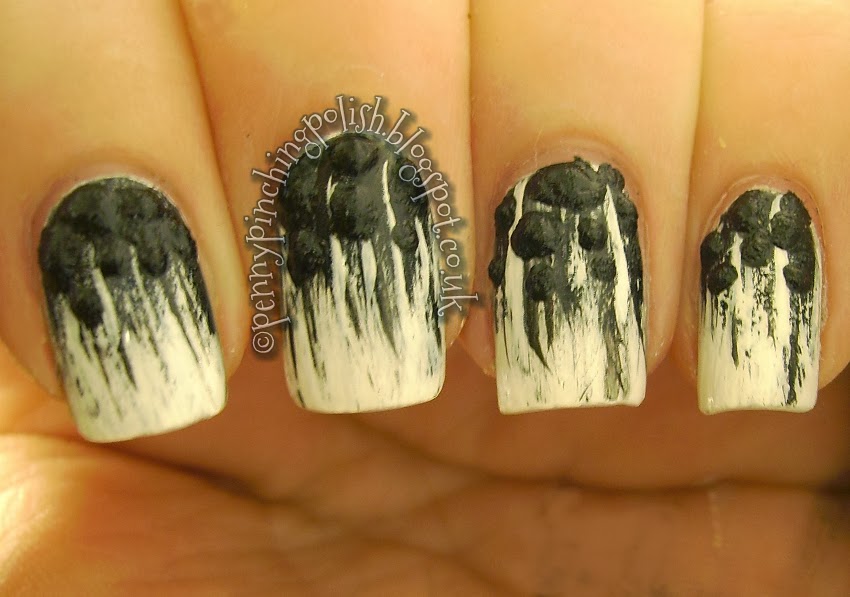
I had an idea I could use a couple of fan brushes to get the base in a sort of jagged gradient, and I actually took pictures of the base too.  I was just making this up as I went along, so I took pictures before adding the next step, as I had no idea whether I would just ruin in completely by adding too much : )
I actually liked it like this, and may have to try this again with other colours at some point.  I did take a striper brush and add a few more dramatic lines to emphasise the effect.
Then I decided I could build some 3D pebbles out of my black textured polish with a dotting tool.  I think I did about 3 or 4 layers in the end.  Took quite a while to dry though : /
That's how it looked afterwards.  Then I got my white polish, and with the skinniest brush I could find, I outlined around the base of pebbles.  This was probably the hardest bit of the whole mani, I did have to go back in with 1 more layer of black on the pebbles, but finally I had this:

Unfortunately, I don't own a really pale blue cream so I just had to go monochrome instead, but I'm pretty pleased with how it turned out anyway.  A bit weird, yes, but very interesting, especially in real life.  They really did look like little pebbles!
   

 What do you guys think of this, just a bit weird, or pure genius?: p   Want to go have another look at that photo? I know I do, I find it mesmerising!  Don't forget to check out the other amazing ladies down at the bottom.