Birds of a Feather

I am very excited about this post. It's feather nails! I've been wanting to try these for months. I picked up the feathers a day or two before my last nail break though so doing these nails was put on hold. My nail has since grown back nicely so I figured it was past time to try feather nails for the first time. 

Birds of a Feather nails nail art nailart mani manicure Spellbound feathers neutral beige spots dots


Before attempting these nails I scoured the internet for blogger tutorials and youtube videos. What I learned is that while everyone has their own quirks, it's all basically done the same way. With this in mind, I set out to complete my own nails keeping the feather tutorials in mind.

Birds of a Feather nails nail art nailart mani manicure Spellbound feathers neutral beige spots dots

I started with two coats of Revlon's Bare Bones. I thought of buying brightly colored feathers or using a bright polish but I wanted these nails to be slightly more classic. I wanted them to look more realistic for my first try. So I went for the realistic feathers and a neutral base color.

Birds of a Feather nails nail art nailart mani manicure Spellbound feathers neutral beige spots dots

What I quickly realized is that the nails were very easy to do. Time consuming, yes but hard, not so much! I would recommend buying the bagged loose feathers. The only realistic feathers my craft store had though was a feather pad . I have no idea what this is used for originally but whatever it's meant for ... I don't think the feathers are meant to be just plucked and pulled off like I was doing. Some of them wouldn't come off at all and those that did left pieces behind. Still, I got more than enough of the feather to work with, so I guess the feather pad worked well enough.

Birds of a Feather nails nail art nailart mani manicure Spellbound feathers neutral beige spots dots

Putting the feathers on was also a fairly simple task. I used the glue-like polish that comes in gem packages. I figured if it can hold on my gems for days it should be no problem to hold on a feather.

The first thing to remember when putting feathers on your nails is that you don't want to trim them too much before you have them practically glued to your nails. They will fall apart! Get them laid on your nails over a layer of clear polish, nothing quick drying because you need time to work, and then trim them around your nail. You'll want a small pair of scissors to do the trimming. I found it easier to trim because mine were both small and sharp tipped. After you get them trimmed around your nail you'll likely find you have some small, sharp pieces hanging over your nail. I recommend turning your scissors at an angle to lay over your nail and trimming the tips this way. Get the bottom blade under the pieces of feather hanging over your nail and use the top blade (still at an angle) to skim the very tip of your nail. Be very careful you don't cut your finger or your nail, just the feather! Anything you can't get with a pair of scissors can be lightly filed with a soft file.

I used three or four coats of a thick, quick dry top coat over the feathers. It took about that many before the polish stopped settling around the feather and the nail got smooth.

Birds of a Feather nails nail art nailart mani manicure Spellbound feathers neutral beige spots dots

Here is the last picture I have to share. It's a natural part of the feather I used on this finger. I didn't even realized one of the spots formed into a heart, but I was ecstatic to see this!! It was like a little bit of love from the feathers themselves.

These feathers stayed on my nails for 5 days, and they only came off because I removed them! This is a very lasting manicure. This might have something to do with the feathers adding some protection to the tips of your nails or simply because you use so much top coat to seal them. Whatever it is, this mani lasts and looks amazing! The reactions you get when you say they're real feathers is also pretty darn cool.

0 comments:

Feature Friday

It's been a very busy week around here so I haven't had much time to browse other blogs. However, I did stumble across this in my feeds. It was love at first sight, and I knew instantly it was this week's feature. :)


nail art nailart nails mani manicure neon tie dye My Nail Graffiti Spellbound Feature Friday Sticks n Stones

This is Neon Tie Dye + Sticks 'n Stones by Amber (and Dustin) over at My Nail Graffiti. First off, I love the colors. I'm a big ol' neon fantic! (I actually have neon on my nails as I'm typing!) Neons are the perfect summer colors in my opinion.


Next, I definitely love how the colors swirl and blend together. Can you believe no orange was used?? Amber says it's just the pink and yellow mixing together. So cool!! Lastly, I just love how all the swirls are in different places on each nail. It doesn't make me want to compare them or pick out flaws. My eyes just follow the swirls and enjoy. I'm also enjoying the addition of Sticks 'n Stones. Personally, it's not something I would have added since I'm always scared of doing too much and ruining the design I've worked so hard on. But, I really like how it looks over the neon. It was a good choice. :)

As always, these are not my nails! I had no hand or say in their creation. This is simply a feature post in an attempt to give another blogger some love. Take a moment, follow the links, and leave a nice comment or two for the featured blogger.

0 comments:

Swimsuit Shopping

Hey everyone. I went swimsuit shopping yesterday! I got my first swimsuit in years for vacation last year after losing about 15-20 pounds. Well, I lost another 10 or so this year. That brings my total to just over 30 pounds lost. Yay for me! However, I'm still not at my goal weight so swimsuit shopping is a fairly trying experience, but I guess that's true for almost anyone, isn't it? Are any of us truly happy with every feature of our bodies? Isn't there something, small or large, each of us wants to change? With the horrors of swimsuit shopping in mind I did a quick swimsuit manicure for luck.


swimming swimsuits bathingsuits suits bathing tankini bikini one-piece polka dots red pink blue nails nailart purple nail art beach shopping Spellbound

I've seen bikini nail art before but I don't think I'll ever look or feel good in a bikini so I decided to do a combination of swimsuits. The first is a sexy pink one shoulder. Next is a sporty blue and white striped swimsuit. Then a red and white polka dotted one-piece that I fell in love with while shopping online (it was $160 though), and then a shiny purple bikini.

swimming swimsuits bathingsuits suits bathing tankini bikini one-piece polka dots red pink blue nails nailart purple nail art beach shopping Spellbound mani manicure/></a></div> <div class=


And on my thumb is a bright orange and yellow polka dotted tankini. I must have done something right with these nails because I came home the proud new owner of a sexy (and slimming) black one-piece suit at a great price!


swimsuit swim suit bathing black JCPenney nail art nails manicure mani nailart /></a></div> <div class=

Here's a picture of my new swimsuit, front and back, taken from the JCPenney website. I will look nothing like this in my swimsuit of course, but I'm thinking of sewing some of those pushup bra swim cup things into mine in an attempt to give myself something on top since it has such a deep neckline but don't want to ruin a $40 suit. Has anyone, or do you know anyone, who has done this? How did it work for you or them?

0 comments:

May+ June Haul


Hello everyone!

IsaDora Magnetic Nails: 3 magnets, 5 magnetic nail polishes


You have already seen my green magnetic nail polish, and here he is with 4 of his siblings. Today I am going to show you what I have bought the last one and a half month. In addition to the IsaDora magnets and nail polishes, I have 8 L.A. Colors minis and 1 top coat, 4 bottles from Ozotic, 3 from Cult Nails, 3 from Pieces, 1 OPI, and a lot from H&M. I have also bought some new nail wheels, and look forward to try striping tape, nail stickers, glitter, eyes, press- on nails, and nail polish remover pads.


So there are a lot of new things for me.  :-) I also like to try "new" brands! And I have even tried to buy some colors that I normally wouldn't use. Now, I think I'll just show you chronologically.

Striping tape in many colors:

Striping tape


Nail wheels:


Nail wheels

 I ordered more of the white ones, but wanted to try clear ones too.


2 from H&M:

H&M: Rising Sun, Lime


Rising Sun: yellow
Lime: lime green

Nail stickers:

Kiss: Nail stickers


Nail polish remover pads:

Patons: Nail Polish Remover Pads


Press- on nails:

Impress: Press- on manicure


I had planned to use these in a birthday I was invited to, but when the day came, I went for pink nail polish. I had not tried them on, and was afraid they would fall off or something. And the pink went well with my dark pink top.
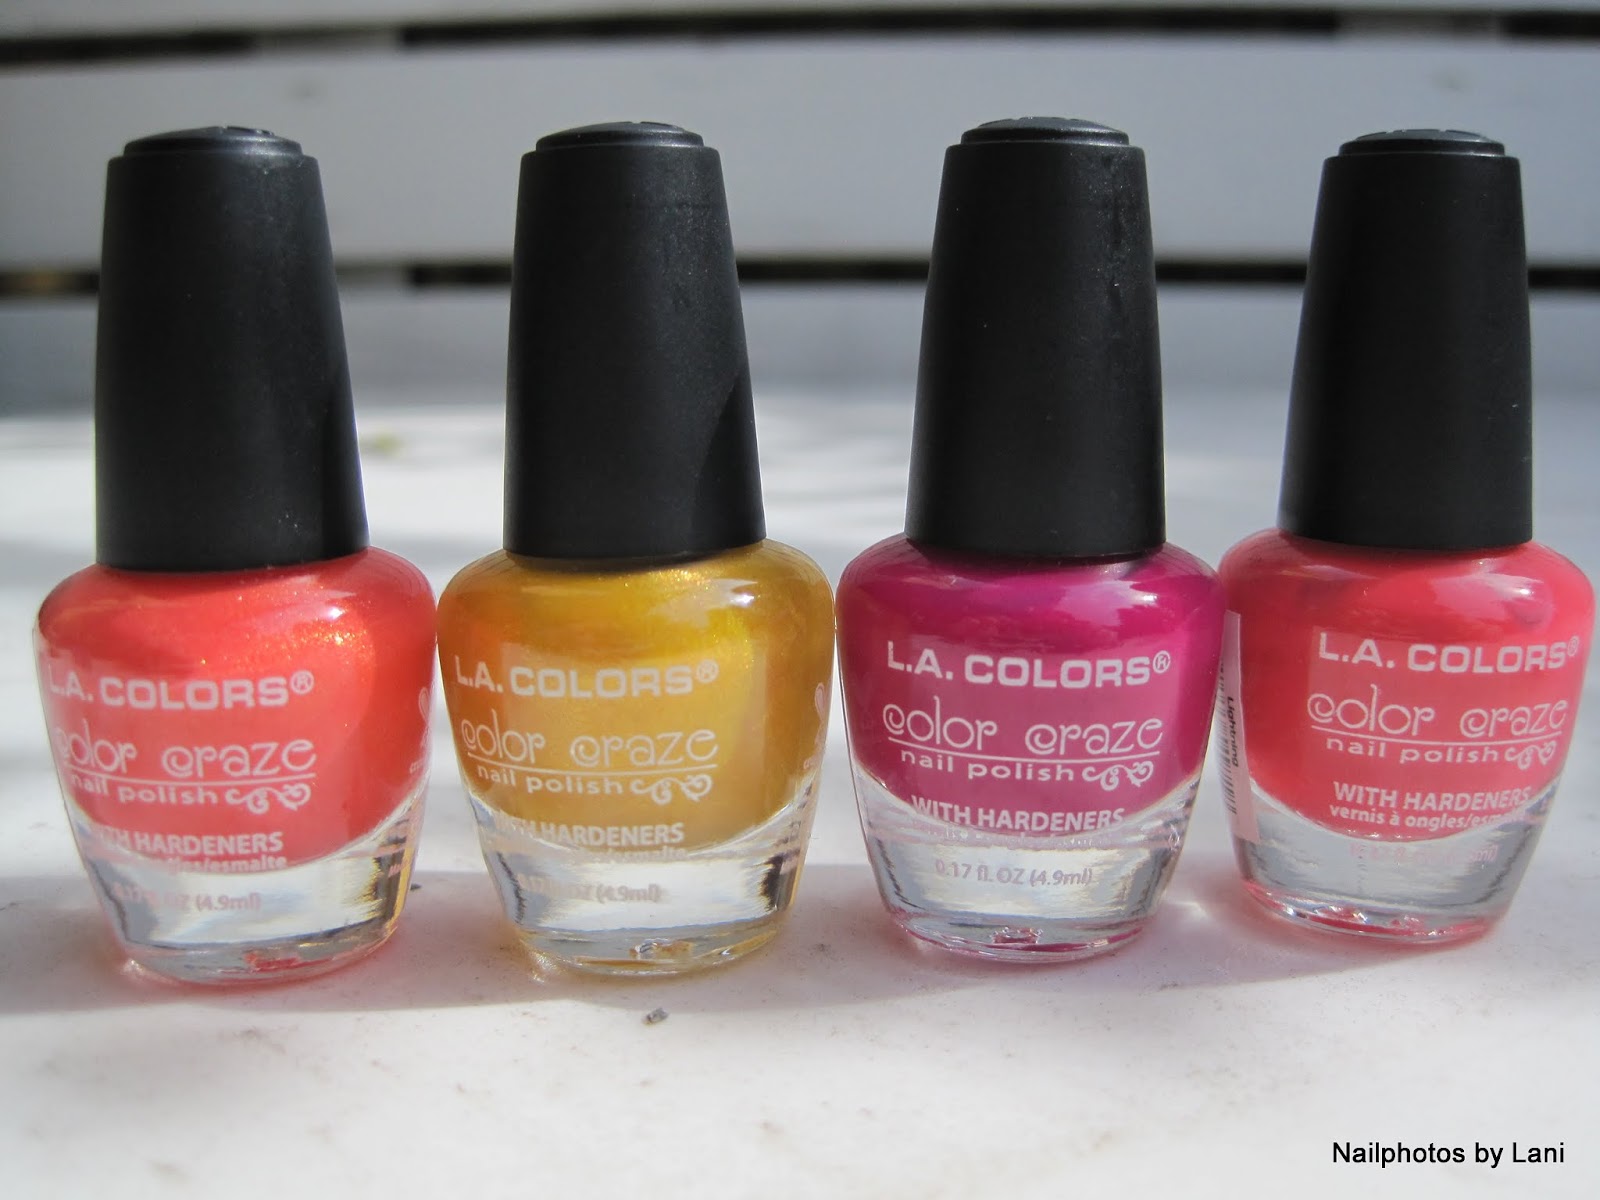


L.A. Colors:

L.A. Colors: Color Craze minis, Rapid dry top coat


8 Color Craze minis:

L.A. Colors: Current, Sea Siren, Splash, Fun in the Sun


Current, Sea Siren, Splash, Fun in the Sun

L.A. Colors: Magnetic Force, Wave length, Phenomena, Lightning


Magnetic Force , Wave length, Phenomena, Lightning

L.A.Colors top coat Rapid Dr


Rapid dry top coat. (I am wearing OPI: Diva of Geneva)

"Cruelty free" label

And it's labelled cruelty- free! Yeay! As you see, these nail polishes are made in China AND are not tested on animals. Regarding non- Chinese brands that are imported to China, according to PETA, China only demands that cosmetics that are sold in China and not produced in China has to be tested. (I know there has been a lot of confusing information about this topic, but I trust PETA. I just wanted to clarify. But I still don't like animal testing.)


Cult Nails:

Cult Nails: Seduction, Wicked Fast, Get It On


Seduction (flakie!!!), Wicked Fast- Speed dry top coat, Get It On- perfecting base coat

I have already started to use the base- and top coat, and I am very pleased with them. But as this is the first fast drying top coat I've used, I can't compare it yet.


Cult Nails nail mail


I was impressed by the environment friendly packaging! :-) And what a great idea to use cotton balls!


Ozotic:

3 multi chrome layering nail polishes, and a multi chrome glitter. The bottles below are in the same order, so that you can see the color change. On the first photo the bottles are standing, and on the second I laid them down. That's the only difference I did.

Ozotic 504, 505, 506, 528


#504, #505, #506, # 528

Ozotic: 504, 505, 506, 528


I hurried to order these, because I heard that Ozotic will not make more bottles of their present collections.


Glitter and brush:


Glitters Sets, brush

These are intended for future glitter- sandwiches and nail art.

Santa did not want to give me these. Instead he gave me OPI Fresh Frog Of Bel Air, which I am very grateful for. And that is what I wear over the green magnetic on some of the photos, in case you were wondering.

The store actually had these glitter tubes in more colors (gold, red, pink) but I thought of which ones would be most suitable for glitter sandwiches, and which glitter nail polishes I already have, and which glitter shapes I wanted. So I chose white and silver, and two colors that I love; turquoise and purple. In addition to small glitter in darker and lighter shades of those colors, there are heart-, star-, and bar shaped glitter.


Eyes:

I smiled when I accidentally discovered these eyes. (I was reminded of Colette from My Simple Little Pleasures' Halloween Mummie Water Marble manicure when I saw the bag of eyes :-) and I can perhaps also use them next Penguin Day...)


I found the glitter and the eyes and the brush in one of these stores (Panduro HOBBY) that has everything related to art, hobby, DIY, sewing, jewelry, etc, for children/ beginners and more advanced. Now that I had my loose glitter and brush, all I needed was a jelly. Some days earlier, I had read about making jelly nail polish, so I went to H&M. (To read it, click here.)


More from H&M:

This time I was looking for holographic nail polishes, and for a blue cream and a clear nail polish to try to make a jelly franken, and a purple and green cream to use as underpants for Seduction, Nfu- Oh #51, and Nfu- Oh #56. But when a lot of the nail polishes were 50% off, or 30% off, I ended up with these:


Blue My Mind (blue), 2 Clear, Coral Rose (orange), Beauty Bandit (purple)


H&M: Plum, Cherry

Mini bottles: 2 Plum, 2 Cherry

Yes, these were also sold last year. I like the bottles, and although they look very small, they actually contain 7 ml.


H&M: Bella's Choice, Polish Me Happy, No mambo Jambo

Bella's Choice, Polish Me Happy, No Mambo Jambo


H&M: Coral Road

Coral Road (above)


H&M: Peppermint Fusion, Beauty Bandit

Peppermint Fusion (blue), Beauty Bandit (purple) (photographed above and below) 

I included a few more photos to show the blue shimmer in Peppermint Fusion.


H&M: Beauty Bandit, Peppermint Fusion

And here are the two blue again. Do you see that shimmer?


H&M: Peppermint Fusion, Blue my Mind


Pieces:

Pieces: Aqua Blue Metallic, Creme Metallic, Blue Metallic


Aqua Blue Metallic, Creme Metallic, Blue Metallic


OPI:

Bottle: OPI Houston We Have A Purple. Thumb: IsaDora 854 Opposites Attract+ Ozotic 528

"Houston We Have A Purple" is my first jelly. Its from the Texas Collection.

Eager to try it out, I tried the quite big glitter that looked white, but it was actually clear :-( So I used a gold and a silver glitter nail polish instead. But it was fun to try the red OPI over different colored nail polishes.
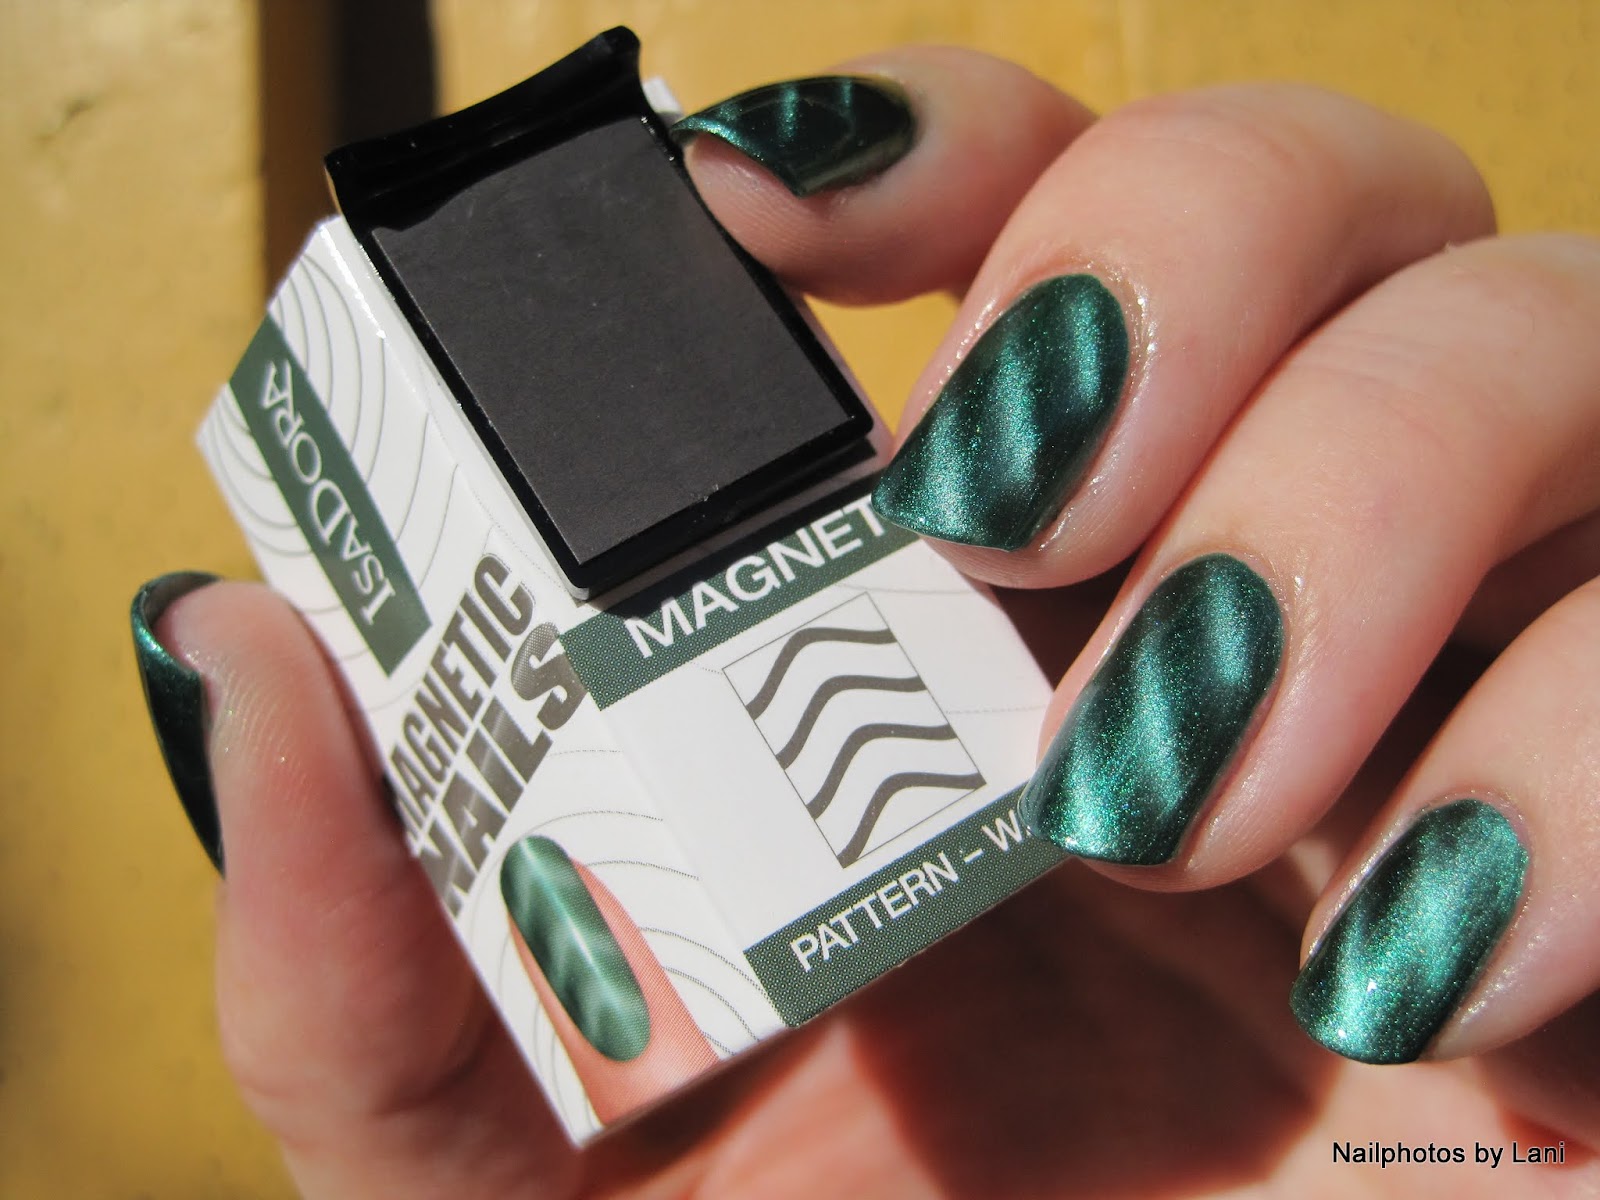

IsaDora:

5 magnetic nail polishes from IsaDora's Magnetic Nails collection:

IsaDora Magnetic Nails: 854, 855, 856, 858, 859


#854, #855, #856, #858, #859

#854: Opposites Attract- green
#855: Northern Light- dark grey with duo chrome pink/ green shimmer
#856: Steel My Heart- grey with teal shimmer on the nail wheel, but the bottle looks purple on the edges. I am curious about this one.
#858: Magnetic Mania- purple
#859: Iron Lady- dark purple

IsaDora magnets


Wave-, diagonal, horizontal- and star pattern magnets

Each bottle comes with the wave magnet. I wonder why they didn't make one unique magnet for each color. Then we could have had 10 different patterns, if we bought all the 10 magnetic nail polishes in the collection. I bought the 3 separate magnets to have more patterns. But now I guess I could use four of the identical magnets to make other patterns. Did you see the post about making your own magnets? If you want to, click here.


Even more from H&M:

This time I went to a different H&M, and to my surprise they had other nail polishes :-)


2 Duo sets:


H&M dou sets: City+ Zoo, Into the Wild+ Back by Noon


Pink set:
Zoo: small holographic glitter
City: very bright dark pink/ red creme (one coater)

Green set:
Into the Wild: small holographic glitter
Back by Noon: gold

These holographic glitters have very little color in them. But I suppose they are meant to be used together with the red/ gold in the set.

H&M: Purple Flash, Purple Glitter


15 ml: "Purple Flash": purple foil (nearly a one coater)
5 ml: "Purple Glitter": purple with gold micro glitter


I hope you all had a nice weekend this midsummer night/ midwinter day- weekend.


Lani


0 comments:

Quidditch is Dirty Work

Today's post is my very first Harry Potter mani. I have dozens of Harry Potter designs sketched in my nail art book, but I've never felt confident enough to complete any. So, when I was completely stumped on what to do with my nails last week I figured it was past time to do something Harry Potter.


nail art nails mani manicure Harry Potter Gryffindor Slytherin Ravenclaw Hufflepuff Hogwarts Houses striped Golden Snitch wings red gold green silver yellow black blue bronze


I went through all my sketches and realized I didn't want to do any of them. I thought briefly about doing something for each book but there are seven books ... too many for one hand and too few for both. I could have also done something for my favorite parts of the books but ... well, I have too many. :)


nail art nails mani manicure Harry Potter Gryffindor Slytherin Ravenclaw Hufflepuff Hogwarts Houses striped Golden Snitch wings red gold green silver yellow black blue bronze


I finally settled on Quidditch as my inspiration. When I think of a Quidditch uniform all I can think of is stripes. I'm not sure why, but I think it has something to do with the Hogwarts striped ties. I tend to imagine the house colors as stripes now. And as all the muddy Quidditch training in the books tells us Quidditch is a dirty job! With this in mind I sponged on some deep brown over the uniforms to create a muddy, dirtied look.


nail art nails mani manicure Harry Potter Gryffindor Slytherin Ravenclaw Hufflepuff Hogwarts Houses striped Golden Snitch wings red gold green silver yellow black blue bronze


Last but not least ... what Quidditch game is complete without the Golden Snitch??


Polish Used
Hufflepuff: Pure Ice Excuse Me & Beauty Concepts unnamed shimmery black
Slytherin: Sally Hansen Emerald City & Sally Hansen Celeb City
Gryffindor: Maybelline Bold Gold & Wet n Wild I Red a Good Book
Ravenclaw: Bon Bon Blue & Petites Bronze Baby
Snitch: Revlon Blue Lagoon, LA Colors White, Maybelline Bold Gold, Wet n Wild Goldmine, Funky Fingers Platinum Record, and a mix of black and white to create the gray used for outlining the wings.


Before beginning this mani I used 2 coats of white polish on all my nails so I could get the brightest colors possible.

0 comments:

Green Magnetic: IsaDora #854 Opposites Attract


Hello everyone!

IsaDora #854 Opposites Attract


I had been waiting for IsaDora's magnetic nail polishes. I don't have much experience with IsaDora, but knew that the brand is on the Cruelty- Free list. So when I saw that the magnetics were available, I immediately bought the ones I liked.

IsaDora #854 Opposites Attract


IsaDora #854 Opposites Attract


IsaDora #854 Opposites Attract


IsaDora has 10 magnetic nail polishes, each with a wave pattern magnet. They also have three separate magnets: star-, diagonal-, and horizontal pattern. I bought 5 and the 3 extra magnets. So today I am going to show you the green one with the diagonal pattern. I had planned to wear my green Nfu- Oh, but was curious about the new green magnetic; IsaDora #854 Opposites Attract.

IsaDora #854 Opposites Attract

IsaDora #854 Opposites Attract


I really like the green shimmer and the pattern.

IsaDora #854 Opposites Attract


I did not use the magnet that came with the nail polish, because I had tried a similar one with the Deborah Lippmann set, and wanted to try something different. So I chose the diagonal pattern magnet.

IsaDora #854 Opposites Attract

IsaDora #854 Opposites Attract


I was surprised by how well the magnet worked, or the strength of the magnet. Or is it the nail polish that contains more iron? What I mean is that the pattern covered my nails very well. But as earlier, it did not work on the sides of on my thumb nails. But on my left thumb, which is not as round as the thumb on my right hand, the pattern covered the middle and left side.


IsaDora #854 Opposites Attract
Each bottle has a detachable carton top.

IsaDora #854 Opposites Attract


I am impressed by how well IsaDora has managed to make easy to follow directions. The separate magnets are also glued to a carton, and comes with the same directions. Below, you see all the four patterns. To the left you see the one that comes with the bottles, and beside the bottle you see the separate magnets.


4 IsaDora magnets


What is recommend is to apply a base coat, apply one coat of the magnetic nail polish, instantly hold the magnet over the nail for 15 seconds, and use a top coat when dry. I used my regular GOSH base/ top coat.

IsaDora #854 Opposites Attract


IsaDora #854 Opposites Attract


I've used the instructions on some nails, and the two coats method on other nails, and did not see any difference. From my short experience, I think the most important is to apply a thick coat (but not so thick that you get bubbles), and use the magnet as soon as possible. Just put the brush in the bottle, don't spend time closing it, and grab the magnet.

IsaDora #854 Opposites Attract


If you touch the nail polish with the magnet, clean it with nail polish remover, and redo your nail. If you get a weak pattern, try applying one more generous coat of magnetic nail polish, and use the magnet once more.

IsaDora #854 Opposites Attract

IsaDora #854 Opposites Attract


The bottle is only 6 ml, and it's OK when I try different nail polishes to find out which I like. Sometimes I wish more brands had mini bottles. But when I find something I like, it's nice to have the opportunity to buy a big bottle.

IsaDora #854 Opposites Attract

IsaDora #854 Opposites Attract


The brush is wide compared to the opening of the bottle. It reminds me of Missha HGR 01. So it is easy to spill. But other than that, I find the brush easy to use.

IsaDora #854 Opposites Attract

IsaDora #854 Opposites Attract


Below, you can see what one coat without the magnetic effect looks like, and the bottle after the carton is removed.

IsaDora #854 Opposites Attract

The first thing I did, was to swatch all my magnetics on a nail wheel. It did not look good on the nail wheel, but I liked the depth and shimmer in the polish on the nail.

IsaDora #854 Opposites Attract


On the nail wheel, #3-7 are my new IsaDora magnetics. #1 and #2 on the wheel are the two magnetics from Deborah Lippmann's Steal My Kisses set, which I have written about earlier. To see my post about #1 (magenta), you can take a look at Part I about the set, and about #2 (amethyst), go to Part II about the set.

If you want to see what IsaDora says about their magnetic nail polishes, click here.

According to Neglelakkmani one should not use fast drying top coats with these magnetics.

Edit: I was very surprised and flattered when IsaDora contacted me and told me that they liked my photos of this nail polish. They asked for permission to use my photos, and of course I said yes! So, don't be alarmed if you see photos from this blog post on their facebook page or blog. As far as I know my photos are on IsaDora's Swedish and international facebook page.


Lani


0 comments: