Sat- ART- Day Club: One stroke mani


Hello everyone!

One stroke mani


This is my first one stroke mani. I have seen tons of tutorials on YouTube, and have wanted to try this technique for a long time. But I needed the Sat- ART- Day Club to get me started. So this is what I made for last weeks Sat- ART- Day Club, when the challenge was to make a the one stroke mani. I'm sorry that I haven't written this blog post earlier. Actually, I had hoped to make many more posts in November, but things don't always go as planned.

I especially have to thank Cutenails/ Tartofraises and Marjorie Harris for teaching me the one stroke technique. I'll include two of their videos for you at the end of the post. This mani is especially inspired by Cutenails, although it's my own design.


One stroke mani

One stroke mani

What I did: 

What I did: 

(After a nail broke that day, and I had to cut them all... My square nails only lasted for one week)

1) Make a base color:
IsaDora Clear (my favorite base coat), 2 coats of H&M Bella's Choice (green), 2 coats of Pierre Reneè #11 Transparent French (orange flakies)

Making a one stroke mani
2) Make flowers with the one stroke technique:
First I mixed a little water with the acrylic paint. Then I used a flat brush that was cut in an angle, dipped one corner of the brush in one color and the other in a different color. Then I made a gradient on the brush from the two colors, by making some stripes on a piece of plastic. And then I was able to make one gradient colored flower petal with only one brush stroke. I waited a few seconds to make it dry a bit. And repeated painting until I was pleased with the thickness of the paint. And then made one more petal, and so on.

Making a one stroke mani


This is only one way of doing a one stroke. But what's important is that you paint with two or more colors at the same time, with each brush stroke.

Making a one stroke mani

3) Then I used a round brush to outline each petal with white.

Making a one stroke mani


4) Top coat and two rhinestones.

I had fun making this, but also some problems. I'm not sure, but I think it was because I tried a different kind of acrylic paint, and the top coat didn't go well with it:

Making a one stroke mani


That's what happened with Seche Vite. I went into shock, but as you can see I managed to take a photo while holding my breath, and staring at the crackled flower, but after a while it fixed itself pretty well. But you can see small lines. Then I tried all my top coats, and Gosh was the only one that didn't react with the paint, but when I used it on another nail, it crackled a bit. But IsaDora Clear and L.A.Colors Rapid Dry didn't have as strong reaction with the paint as Seche Vite. And I think I had waited long enough for the paint to dry. How do I know how long to wait? Any advice?

So for once (for you who want to look closely) here's the list of top coats used:
Thumb: Seche Vite Dry Fast top coat
Index finger: IsaDora #600 Clear base-/ top coat
Middle finger: Gosh #01 base-/ top coat
Ring finger: L.A. Colors Rapid Dry
Pinky: Gosh #01 base-/ top coat

One stroke mani

Lighting:

Some photos are taken in low light, to have some photos where the cracks don't show so well. To show you what the purple color looks like in real life, some photos are taken in a light that also makes my skin a little yellow. And some are taken under a very strong LED bulb. The very first photo is the one that shows the real color of my nails best.
One stroke mani

One stroke mani, low light

Paint & brushes:


Before all this I went to the mall to buy a brush that was cut in an angle, and black acrylic paint. They advised me to use Hobby lacquer (instead of the acrylic paint I have used earlier, that is meant for painting on canvases). I found a little set on sale, and also bought a purple of the same type of paint. And I also found the brush in a set of brushes in the junior section.

My new Hobby Lacquer and brush set
Hobby lacquer is a type of acrylic paint, and I'm not sure how it's different from regular acrylic paint. I really liked the Hobby lacquer (, if we forget about the top coat problem for a little while). It was very easy to work with, and I was surprised that the flowers turned out so well. And it was easier to make nice lines. It was also easy to remove my mistakes or paint from my skin with wet cotton. So I liked the Hobby Lacquer better than the acrylic for canvas.

The second from the right was used for one stroke. The left one was used  outline

But I wish I had bought smaller brushes. The flowers became much bigger than I had planned. So you nearly don't see the flakies. I used flakies because I wanted to make some orange flowers too, but the orange was too similar to the white, and therefor I went for only purple and white flowers

One stroke mani


The one stroke technique:

Cutenails/ Tartofraises shows three ways to make one stroke flowers with two colors on nails:


MarjorieHarris shows how she uses the one stroke technique with three colors to make roses on a canvas:


I'm always fascinated when I look at videos of professionals like Cutenails/ Tartofraises, Marjorie Harris, Robin Moses, Colette (/My Simple Little Pleasures on YouTube), LOVE4NAILS, and others, and am very thankful that they make tutorials for us. I hope you don't get sad because they are so good at art, and that you can find joy in looking at these tutorials and find inspiration. Remember that they have practised and practiced too. Probably for very many years.

One stroke mani


I liked this technique, and want to use it again soon. I only wish I had smaller brushes for my small nails. I've been looking at small nail art brushes online, but couldn't decide which to buy. And it would have been nice to know what happened when I put top coat on, so that I don't ruin my next manis. I really liked my new paint, and it would be sad if I couldn't use it.

And as usual, you can see all the other Sat- ART- Day Club manis below

Lani

0 comments:

Faceted

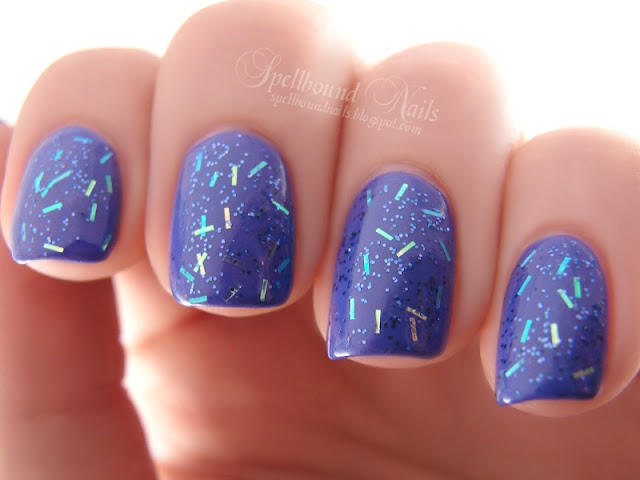
Today I have another glitter swatch. And I thought, why not start the holiday posts early? This is Faceted from the Sinful Colors Holiday Shimmers Collection.

nails nailart nail art polish mani manicure Spellbound Sinful Colors Color Swatch Faceted glitter bar shimmer Holiday Shimmers collection purple iridescent Wet n Wild On a Trip

I used two very thin coats of Faceted over Wet n Wild On a Trip. I'm not usually a big fan of bar glitter but I love this. It's just the right amount of bar to shimmer.

nails nailart nail art polish mani manicure Spellbound Sinful Colors Color Swatch Faceted glitter bar shimmer Holiday Shimmers collection purple iridescent Wet n Wild On a Trip

Add some character to this mani by doing the first coat of glitter normally and the second with a few side to side swipes. This will turn the bar glitter so it's not all going in the same direction.

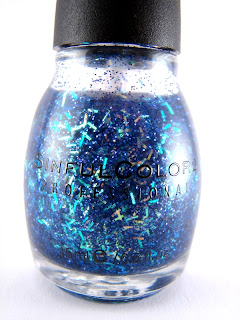
nails nailart nail art polish mani manicure Spellbound Sinful Colors Color Swatch Faceted glitter bar shimmer Holiday Shimmers collection purple iridescent Wet n Wild On a Trip bottle

I didn't manage to get any really great pictures of this polish on my nails so here's a picture of the bottle. This glitter is definitely in my Top 5 ... maybe even in my Top 3.

0 comments:

Maple Syrup from the Daily Lacquer

I'm really sorry for such a late night post guys, but I am so behind on picture editing. Still, I just couldn't put this post off another day. I entered into a Facebook flash giveaway from the Daily Lacquer last week totally not expecting anything, but I won! As one of three winners, I got to choose one bottle of Daily Lacquer's nail polish. Beyond exciting!! I decided to take a chance and ask for Maple Syrup from what was the then upcoming Buddy the Elf Collection. This collection is now out and selling like wildfire along with her Sailor Moon inspired The Lovely Moon Collection and The Holo-Day Lovelies Collection. She totally deserves some major kudos!

nails nailart nail art polish mani manicure Spellbound Maple Syrup Buddy the Elf Collection Daily Lacquer Lacquerista brown bronze gold orange red glitter Indie black Sally Hansen China Glaze green flash giveaway winner Holy Day Holy-Day Chocolate Creme

I can't compete with the awesomeness of Daily Lacquer's bottle photos, but I gave it a shot. I love these bottles. They are just the perfect fit-in-your-hand bottles, and they look pretty too! Made even prettier by that cute glued on bow. What's better than such a personal touch to every bottle?? You just don't get that from big name brands.

nails nailart nail art polish mani manicure Spellbound Maple Syrup Buddy the Elf Collection Daily Lacquer Lacquerista brown bronze gold orange red glitter Indie black Sally Hansen China Glaze green flash giveaway winner Holy Day Holy-Day Chocolate Creme

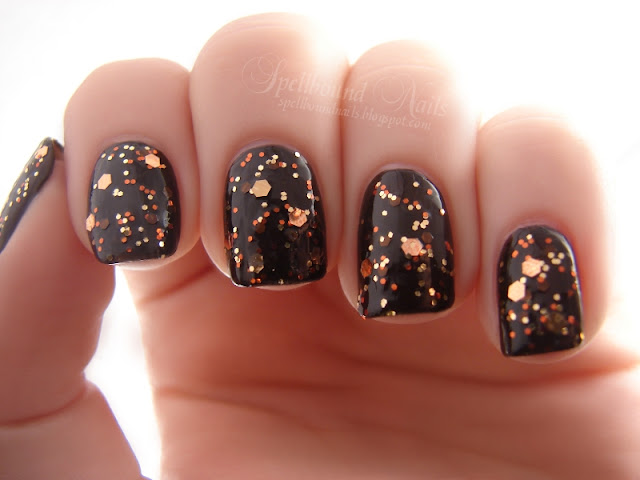
My first use of this beautiful brown/bronze/gold glitter was over China Glaze Holly-Day. This combination is such a rustic Christmas combo.

nails nailart nail art polish mani manicure Spellbound Maple Syrup Buddy the Elf Collection Daily Lacquer Lacquerista brown bronze gold orange red glitter Indie black Sally Hansen China Glaze green flash giveaway winner Holy Day Holy-Day Chocolate Creme

My next choice was brown. I used Sally Hansen Chocolate Creme. It went on a lot darker with two coats than it looked in the bottle. In the bottle it was a gorgeous chocolatey brown. On my nail it turned black.

However, this color change was a good thing. It shows just what a chameleon Maple Syrup truly is, because it didn't get lost in such a dark color! It actually spiced it up. In my opinion, this glitter can go over anything and look amazing.

Did I mention this is my first Indie polish? I'm happy to say all the hype is well deserved. Maple Syrup went on smoothly. It wasn't thick or gooey and had no overpowering polish scent like a lot of big name brands. The glitter applied really easily. I didn't need to dig at all for the larger glitters. And using two coats of glue before my base coat made removing the glitter a snap ... or rather a peel. :)

0 comments:

China Glaze It's a Trap-eze!

Today I have one of polishes from China Glaze Cirque du Soleil collection for you guys. Also, don't forget to participate in my American Apparel giveaway, here.

I had to show you this one first from picks from this collection, because this is definately my favourite one. It's a milky white jelly base with multi-colored glitter. I think this is really an awesome polish, though you have to work a bit to get it look nice. First I did two thin coats with some additional glitter placing and then topped it of with a bit thicker third coat. So the formula isn't anything you couldn't work with if you just are a bit more careful than usual. Also you probably need to use two coats of top coat, because this dries a bit bumpy. I think the polish is so pretty that at least I'm willing to put some extra work in just to wear this. It's so pretty and fun, so in my opinion this a must-have polish, because there isn't too many polishes like this, at least not made by mainstream brands. In fact, this does look a lot like an indie polish. So get this while you can!


Nail Tek Foundation II
China Glaze It's a Trap-eze 3 coats
China Glaze Fast Forward 2 coats

0 comments:

L is for ...

It's Wednesday again, and you know what that means—another ABC Challenge mani.

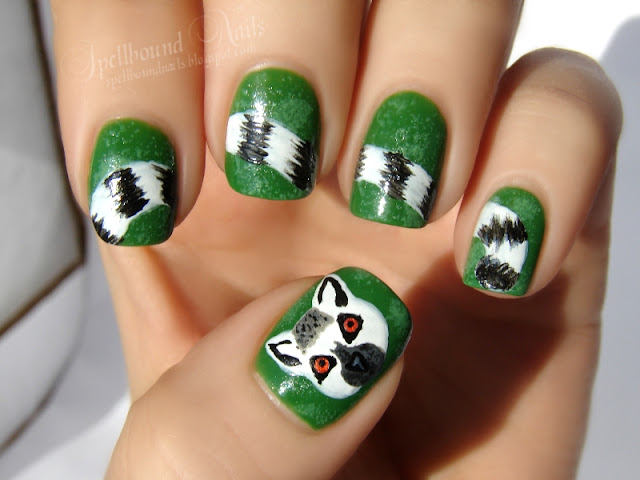
L is for ... Lemur Catta aka the Ring-Tailed Lemur!


nails nailart nail art polish mani manicure Spellbound ABC Challenge hand drawn painted L is for Lemur Catta Ring Tailed Ring-Tailed animals primate tail stripes black white green gold orange

I think lemurs are some of the most adorably weird creatures. I think of them as a combination of a koala, a cat, and a dog. Yes, that's silly of me. But they have the furry fluffy coloring of a koala, the slinky graceful body of a cat complete with long twitchy tail and there's something oddly reminiscent of a dog in their face. I think it's the long muzzle-like nose and the big expressive eyes. Look through some pics of ring-tailed lemurs and tell me I'm not right!


nails nailart nail art polish mani manicure Spellbound ABC Challenge hand drawn painted L is for Lemur Catta Ring Tailed Ring-Tailed animals primate tail stripes black white green gold orange

I decided on a green background for these nails. When a lemur isn't in the trees, they're usually bouncing around in the grass. Green seemed like a good idea. I used two coats of Sinful Colors Exotic Green then mixed it with a little white and used my eyeshadow applicator to dab on the lighter green. You know how I love my texturing. :) The rest, lemur face and tail, were all hand drawn.

0 comments:

500 Follower Giveaway!!

Hey girlies!! My internet was down all yesterday or I would have had this posted much sooner. Check out my 500 follower giveaway. I don't have 500 followers yet ... but I hope to after this. :)

Please read the rules before entering.


Rules:

Giveaway is open to United States residents only.

Giveaway ends midnight, 12/03, and the prize will be shipped that weekend (as long as everything goes to plan). This will give me time to verify entries and choose a winner. A winner will be chosen at random and will have 48 hours to reply to winning email. If I get no reply, I will be forced to choose another winner.

All entries, except your email address (I'll need that to contact you), are optional. I would love to have you as a follower, but I will not require it for this giveaway. However, remember that each completed entry gives you another chance to win. :)


a Rafflecopter giveaway

The prize was purchased by me and this giveaway is in no way sponsored, endorsed, or administered by, or associated with Bath & Body Works.

0 comments:

Color Club Gift of Sparkle

Today I have a polish from a this year's holiday collection for you. It's from Color Club's Winter Affair holiday collection and it's the purple one called Gift of Sparkle, take a look!

The coverage with this wasn't so good, so I used three coats. This was also at the same time really thick and quite goopy so you had to be really careful not to end up with too thick coats of polish. If I'd love the color, I guess I could forgive these issues, but somehow this wasn't so special to me colorwise either. Which is kind of surprising as it is my favourite color, purple and also it has some holographic glitter in it. But I guess the issues with the quality of this polish made me like it less colorwise too.. And I do have a similar polish in my stash (Kiko #255) that I prefer over this, so I guess Gift of Sparkle won't be having a place in my stash.


Nail Tek Foundation II
Color Club Gift of Sparkle 3 coats
China Glaze Fast Forward

0 comments:

American Apparel Giveaway!

****THIS GIVEAWAY IS NOW CLOSED!****


I haven't had a giveaway here in my blog for a while and I decided that it was time again to thank all my readers, so here's a little American Apparel giveaway for you guys! I hope you all like it!

There will be two winners and both prizes are basically the same. I just want to quickly remind you that I'm still doing my studies at university, so I'm constantly on student budget, so these prizes won't be so huge that some blog have. But I've bought everything with my own money and everything is new and unused. So, let's see the prizes, right?

So both prizes have three American Apparel polishes (both have the same polishes) and one sheet of 3D-color pads (16 pads in each).

The polishes in both prizes are called Office, L'Esprit and Dance.


You get one entry by participating to the giveaway, but you can also get extra entries too. Those extra entries are voluntary and you can do only one or both or none. I also added question about your home country to the end of the form just because I'd like to know where my readers come from, but answering that doesn't give any extra entries or isn't in any way mandatory. Also there's a comment box at the end if youd like to say something, but again that's not mandatory or doesn't give any entries.

So here are the rules:
1. You must be a public follower via Google Friend Connect, new followers are of course welcome. Let me know your GFC name and your e-mail, so I can easily contact the winner. (1 entry)
2. If the winner(s) doesn't answer to my email within 48 hours, I will draw another winner.

For extra entries:
2. You can post about this giveaway or put it in your giveaway page or sidebar. You can use one of those pictures too. Please provide a link. (3 entries)
3. Add me to your blogroll or if I'm already there, please provide a link. (1 entry)

The giveaway is open internationally! To participate just fill the form below.

This giveaway will end on 16th December 2012 at 9PM (EEST).  ***CLOSED!***
 

0 comments:

Christmas nail art stickers (382)


Hello everyone!


I have been contacted by KKCenterHk again, and one of the things I chose are these Christmas stickers. Nail stickers is an easy way to make a special mani on big days, when you have too much to do and think about. I will show the stickers used on an accent nail, with one image on each nail, and with glittery tips. Christmas is only one month away!

First I'll tell about the stickers, and then lots of photos.

One pack of stickers is enough for 3,5 full manis. So there are 6 of each image. There are 6 different images. I have used 4; Santa, snowman, penguin, and a tree with a star.


The images are in many colors: red, blue, green, yellow, orange, black, and white, with glitter. But because the stickers are placed on see through plastic, it's easy to check which polish will work best.


There are instructions on the back side.


KKcenterHk have very many stickers, or 3D Nail Seals, as they call it. So if you want Christmas stickers that are more monochrome, you have many to choose from. But if you want to use these stickers and you want your mani to match different colored clothes, you can either choose to just do an accent nail, like I did with the snowman, or you can add glitter, or you could only use two images on all the nails. Or you can use all the different colored stickers and add a multicolored glitter french, to enhance the multicolor look so much that your mani actually goes with nearly everything.


Different image on each nail:


Accent nail:


With glitter tips:


Used:
Nail stickers: 3D Nail Seal Xmas Christmas Bell Tree Penguin Design Seal-382 [3D-382]  
H&M: Je t'aime
Deborah Lippmann: Happy Birthday
top coat


Thank you KKCenterHk for giving me these Christmas stickers and the coupon code "Nailphotos by Lani". You can use this coupon code and save 10% on your order until January, 31st, 2014. (Edited January, 2013)


Lani

0 comments: