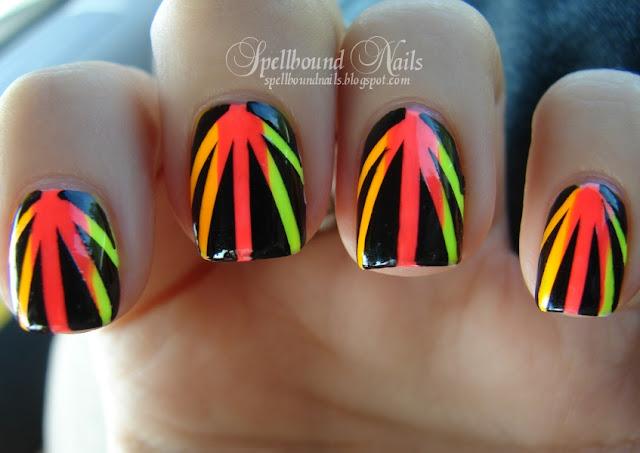
Neon Sunbeams
I'M BAAACK!!! Well, I've been back for a week but I needed time to mourn the loss of the beach. I missed it horribly this week. Gasp, I didn't even want to do my nails this week! However, that's over with, and I'm ready to get back into my usual posting schedule. I have a few nail designs saved up for you but I want to share my beach nails in this post. The design for this post was inspired by Neon Rays by Chloe's Nails. I thought they were the perfect nails to arrive at the beach with. And these nails are amazingly easy to do. The hardest part was actually cutting the tape since I don't own any striping tape.I'm not sure where the idea came from, I remember reading it on a blog somewhere, but the easiest way to cut the tape is to take a strip of the tape and place it on a sheet of wax paper. That way the tape doesn't stick to your scissors and you can get nearly perfect 'beams' every time. Simply peel them off once your base polishes are dry and create the beam pattern. I used the fairly standard beam pattern but you could turn the beams around, do different beam patterns on different nails or even do something else like zigzags.
Speaking of the base polishes, you gals should know by now that I always use two (or more) coats of white to make the neons pop. This time I used two coats of China Glaze White on White. The neon polishes are China Glaze Sun Worshiper, Color Club Yell-Oh! (which looks slightly green to me and these pictures agree), and Funky Fingers Kingston. I didn't do or use anything special to get the polishes lined up on my nails. I tried using a nail art brush but they were simply too small to work with so I used the polish brush and carefully painted stripes on either side of my nail and finished with a stripe down the middle. These colors took two coats and I was extra careful with the final coat to touch up any mistakes I made with the first. It may sound daunting and there is a moment of panic before you begin (how could such a large brush make three lines without overlapping horribly?) but it's really not once you start! Trust me! You will want to be careful with the wider brushes such as some of the Sally Hansen brushes and the Wet n Wild Pro brushes. If you just have to use one of these brushes try tipping the brush in it's side. That will give you a slimmer brush to work with.
Let your base polishes dry. You can add a top coat before taping for extra protection against chips and bleed through and also to give a smoother finish if you like. After your polishes are dry simply tape your pattern. Make sure the tape lays flat and remember to fold the ends of the tape over your nail tips and work it into the creases of your fingers. Coat your nail (and the tips of your nail between the tape) in your top polish. I chose black but again it doesn't have to be black. Once you have your top polish on immediately remove your tape. I use a pair of tweezers to grasp the tape (less messy and a smaller chance of smudging already completed nails) and get best results when I pull the tape slowly and smoothly back over my nail from the tip ... much like waxing in slow motion. :)


.jpg)


.png)

0 comments: