Sephora Giveaway Reminder


This is a reminder that The Great Sephora Giveaway is ending Saturday. Really, it ends midnight the 31st but midnight makes it September 1st, right? Either way, this is just a reminder to get your entries in before it ends.

I also want to thank all those who have already entered. Over 2500 entries? Nearly 300 GFC followers, 225 on Tumblr, and 29 Hellocotton as I'm typing this?? Plus all those who follow invisibly? You all have made this an amazing giveaway, and I couldn't possibly love you more!! ♥ I hope you all find something about my blog that will keep you following me. :)

0 comments:

Watermelon Nails

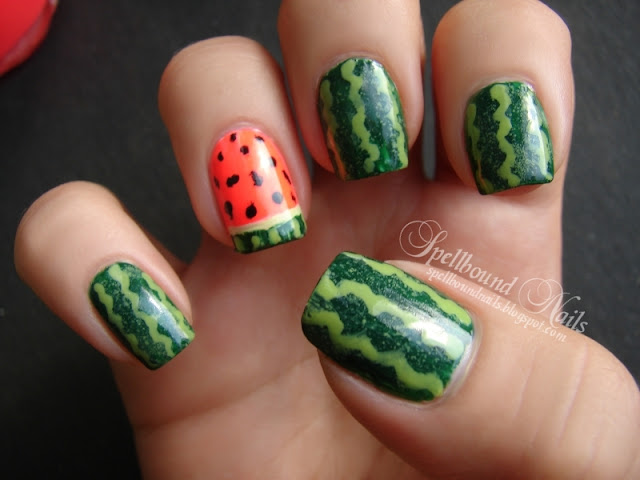
Wow, is it time for another post already? I was going to use yesterday to get my pictures all nicely resized and watermarked and, if I had some extra time, get a few posts typed up for auto-posting ... yeah, that didn't happen. Lol! I spent the past two days doing extreme cleaning. I don't know about you but cleaning makes me hungry and there's nothing better than a nice refreshing watermelon!


nails nailart nail art Spellbound mani manicure watermelon fruit green China Glaze Holly-Day Sally Hansen Green with Envy Funky Fingers Kingston realistic

This design was originally done by The Polish Well. I fell in complete and total love with this idea after seeing her nails posted on Beautylish. I debated doing them on my own nails since she had already done such an amazing job on them ... but you should know by now that I have no impulse control. I couldn't resist.


nails nailart nail art Spellbound mani manicure watermelon fruit green China Glaze Holly-Day Sally Hansen Green with Envy Funky Fingers Kingston realistic

I knew immediately that I wanted to use Funky Fingers' neon Kingston for the flesh of the watermelon. For the skin, I decided to go slightly more realistic by using China Glaze Holly-Day as a base and dabbing on a light speckling of Sally Hansen Green with Envy. I also used this color to draw the squiggles onto the watermelon.

I wish I had had a watermelon on hand (no pun intended) so I could have pictures of this mani next to a real watermelon. My family were amazed at how real they looked when we went shopping while I was wearing this mani.

0 comments:

Neon Sunbeams

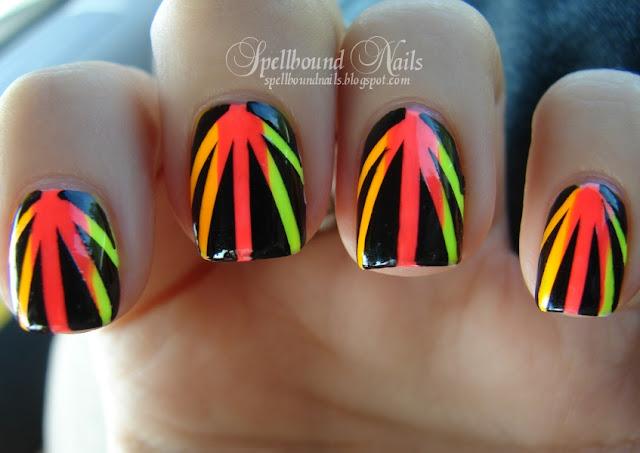
I'M BAAACK!!! Well, I've been back for a week but I needed time to mourn the loss of the beach. I missed it horribly this week. Gasp, I didn't even want to do my nails this week! However, that's over with, and I'm ready to get back into my usual posting schedule. I have a few nail designs saved up for you but I want to share my beach nails in this post. The design for this post was inspired by Neon Rays by Chloe's Nails. I thought they were the perfect nails to arrive at the beach with. And these nails are amazingly easy to do. The hardest part was actually cutting the tape since I don't own any striping tape.

nailart nail art nails mani manicure Spellbound Neon Sunbeams Rays Sunrays China Glaze Funky Fingers Color Club Taped Taping Tape orange green yellow pink hot black white Sun Worshiper Kingston Yell-Oh!

I'm not sure where the idea came from, I remember reading it on a blog somewhere, but the easiest way to cut the tape is to take a strip of the tape and place it on a sheet of wax paper. That way the tape doesn't stick to your scissors and you can get nearly perfect 'beams' every time. Simply peel them off once your base polishes are dry and create the beam pattern. I used the fairly standard beam pattern but you could turn the beams around, do different beam patterns on different nails or even do something else like zigzags.

nailart nail art nails mani manicure Spellbound Neon Sunbeams Rays Sunrays China Glaze Funky Fingers Color Club Taped Taping Tape orange green yellow pink hot black white Sun Worshiper Kingston Yell-Oh!

Speaking of the base polishes, you gals should know by now that I always use two (or more) coats of white to make the neons pop. This time I used two coats of China Glaze White on White. The neon polishes are China Glaze Sun Worshiper, Color Club Yell-Oh! (which looks slightly green to me and these pictures agree), and Funky Fingers Kingston. I didn't do or use anything special to get the polishes lined up on my nails. I tried using a nail art brush but they were simply too small to work with so I used the polish brush and carefully painted stripes on either side of my nail and finished with a stripe down the middle. These colors took two coats and I was extra careful with the final coat to touch up any mistakes I made with the first. It may sound daunting and there is a moment of panic before you begin (how could such a large brush make three lines without overlapping horribly?) but it's really not once you start! Trust me! You will want to be careful with the wider brushes such as some of the Sally Hansen brushes and the Wet n Wild Pro brushes. If you just have to use one of these brushes try tipping the brush in it's side. That will give you a slimmer brush to work with.

nailart nail art nails mani manicure Spellbound Neon Sunbeams Rays Sunrays China Glaze Funky Fingers Color Club Taped Taping Tape orange green yellow pink hot black white Sun Worshiper Kingston Yell-Oh!

Let your base polishes dry. You can add a top coat before taping for extra protection against chips and bleed through and also to give a smoother finish if you like. After your polishes are dry simply tape your pattern. Make sure the tape lays flat and remember to fold the ends of the tape over your nail tips and work it into the creases of your fingers. Coat your nail (and the tips of your nail between the tape) in your top polish. I chose black but again it doesn't have to be black. Once you have your top polish on immediately remove your tape. I use a pair of tweezers to grasp the tape (less messy and a smaller chance of smudging already completed nails) and get best results when I pull the tape slowly and smoothly back over my nail from the tip ... much like waxing in slow motion. :)

0 comments:

H&M Coral Road+ Nubar 2010 mattified


Hello everyone!

H&M: Coral Road+ Nubar: 2010+ Gosh: #600 Matt effect top coat


Today I want to show you the mattified version of Coral Road by H&M (coral cream) with Nubar 2010 (flakie) layered over it.


H&M: Coral Road+ Nubar: 2010+ Gosh: #600 Matt effect top coat

I used my regular matte top coat from GOSH (#600 MATT EFFECT TOP COAT). It does the job, and was the cheapest I could get, that also was on the Cruelty- free list. I think I bought it on sale a year ago. Other than that I don't have much to say.  But as usual I have lots of photos for you.

I have written about both of the other polishes earlier. Here is the link to H&M Coral Road on its own, and the shiny version of Nubar 2010 layered over H&M Coral Road. H&M and NUBAR are also not tested on animals.

H&M: Coral Road+ Nubar: 2010+ Gosh: #600 Matt effect top coat

H&M: Coral Road+ Nubar: 2010+ Gosh: #600 Matt effect top coat

H&M: Coral Road+ Nubar: 2010+ Gosh: #600 Matt effect top coat

H&M: Coral Road+ Nubar: 2010+ Gosh: #600 Matt effect top coat

H&M: Coral Road+ Nubar: 2010+ Gosh: #600 Matt effect top coat

H&M: Coral Road+ Nubar: 2010+ Gosh: #600 Matt effect top coat


H&M: Coral Road+ Nubar: 2010+ Gosh: #600 Matt effect top coat


Some like flakies mattified and some like them shiny. In this case I like the mattified version best. Which do you prefer?

Lani

0 comments:

Nails and Stuff's Summer Nail Art Contest: Flowers


Hello everyone!


This is what I made for the Summer Nail Art Contest, hosted by Shannara from Nails and Stuff. The deadline was August 21th, and the time for voting ends by midnight CET tomorrow (Friday 24th).

Thank you for hosting this contest Shannara!

Summer Nail Art Contest: Flowers


To see all the entries, and vote for the one you like best, click here. There are some very beautiful entries.


In this contest the theme is summer, and artistically we were completely free! :-) So we could use everything we wanted, stamping, stickers, water decals, and so on. I decided to try to paint flowers, because that is what reminds me most of summer. To read more about the contest and the awesome prize, click on the Summer Nail Art Contest- picture above.

Below you can see my entry- photo, more photos, what I used to make this manicure, and some "making of"- photos.

Summer Nail Art Contest: Flowers


I tried to copy the flowers on this cup.

Summer Nail Art Contest: Flowers


Summer Nail Art Contest: Flowers


Summer Nail Art Contest: Flowers

Summer Nail Art Contest: Flowers

Summer Nail Art Contest: Flowers

Summer Nail Art Contest: Flowers

Summer Nail Art Contest: Flowers


What I used:

Nail polish:
Pieces: Aqua Blue Metallic
Cult Nails: Get It On (base coat)
Cult Nails: Wicked Fast (fast drying top coat)

Acrylic paint: (Maries)
White: 104 Titanium White
Warm red: 302 Scarlet
Cold red: 315 Crimson Red
Cold yellow: 215 Lemon Yellow
Gold: 132 Gold

Brushes: a flat and a tiny round

Materials used for the Summer Nail Art Contest: Flowers
"The making of"- photos:

Background color: Pieces "Aqua Blue Metallic" with top coat:

Pieces: Aqua Blue Metallic+ Cult Nails: Wicked Fast
Originally I wanted to paint palm trees and coco nuts on a beach, but after I had to cut my nails, I kind of gave up for a while. So when I finally wanted to try to participate again, I didn't have much time left, and I had many other things to do. I chose this background color because it could work as both sea and sky. Then I changed my mind, and went for flowers instead.
Pieces: Aqua Blue Metallic+ Cult Nails: Wicked Fast


I started with the yellow center of the flower, and then painted the flower with white paint:
The making of Summer Nail Art Contest: Flowers
My kitchen table. I used the little knife to mix the colors on my palette.
The making of Summer Nail Art Contest: Flowers

The finished flowers with top coat:
Making of Summer Nail Art Contest: Flowers


If you haven't done it already, head over to Nails and Stuff, and take a look at Shannara's beautiful and classy nail art.

Lani

0 comments:

Nubar Prize

It's almost the end of summer and I'm trying so hard to wear all the pretty holographic polishes, but I think I'm running out of time... Well, today I have yeat another beauty for you:

This one is Nubar Prize and as you can see it's has a really scattered holo effect. I bought this because I'm still missing a perfect red holographic and while this is really pretty, but somehow it wasn't just how I wanted it to be. Don't get me wrong, this is really gorgeous, it's even more gorgeous IRL than in pics, but it is a bit pinkish red, so not the true red that I was looking for. I do have to say that I really like these kind of scattered holos too, I think that all of the holographic polishes don't have to be those insanely linear ones (though of course I love them too!). I had a bit of hard time capturing the holoness of this, but it's there.

Do you guys like scattered holos like this or do you prefer the linear ones?

Orly Bonder
Nubar Prize 2 coats
China Glaze Fast Forward

0 comments:

Nubar 2010 over H&M Coral Road


Hello everyone!

Nubar 2010 over H&M Coral Road

I love flakies, and today I want to show you Nubar 2010 over a coral cream.


Nubar 2010 over H&M Coral Road

If you want to see the cream on its own, here is the link: H&M Coral Road. Look how it matches my watermelon! :-)

Nubar 2010 over H&M Coral Road


On the photo above I'm wearing one coat of Nubar 2010. The rest of the photos are taken after one extra coat of Nubar 2010. The ones taken outside in the sun are without top coat, because I hurried outside to make use of a little glimpse of sunshine.

Nubar 2010 over H&M Coral Road


When I bought Nubar 2010 about a year ago, I thought it was my first flakie. But later I understood that my first was Red Magma. But Red Magma is opaque, and Nubar 2010 was my first flakie that was meant for layering. And I immediately wanted to try it over all colors. So it got it's own nail wheel. So far I've been wearing it over pink, red, green, orange and blue, and now coral. I find it interesting to see how the flakies look over different colors.

Nubar 2010 over H&M Coral Road

If you are wondering what I'm holding, it's apricots.

Nubar 2010 over H&M Coral Road


For those of you who are not familiar with Nubar 2010, it is a clear nail polish with flakies that can change color from yellow to orange to green, depending on light and angle. So you can see the color shift when you move your fingers. In sunshine many of the flakies look dark, as if I can see their shadow. Nubar 2010 was made to celebrate Nubar's 10 year anniversary.

Nubar 2010 over H&M Coral Road


The bottle:

Nubar 2010 over H&M Coral Road
Nubar is formaldehyde, phthalate and toluene free.
Nubar 2010 over H&M Coral Road

Nubar 2010 over H&M Coral Road

Nubar 2010 bottle with cruelty- free label

As you can read on the bottle, Nubar is a US brand, and cruelty- free :-) Because there are so many changes nowadays, I checked PETA's list. And found out that: Nubar is still certified vegan and cruelty- free.

There are lots of similar polishes from different brands, but few of them are on the Cruelty- free list, so if you are looking for a yellow- orange- green flakie, and this polish is available in your part of the world, it's a good alternative. By the way- did you read about the new testing method that is developed in South Korea? It is a different way to test cosmetics that doesn't involve animals.

I tried to find a link to Nubar's web page, but something was wrong with it. Here is a link to Harlow & Co, where it's possible to buy Nubar, and you can read what they say about this polish; NUBAR 2010. It's also possible to buy it from NailPolishCanada, eBay, and probably other places that I don't know.

Lani

0 comments:

China Glaze Desert Sun & Sation Track Starlet

Today I have a pretty layering mani for you guys!

I used China Glaze Desert Sun and Sation Track Starlet for this. I think these two went very well together and I even got compliments on this mani! Sation is a new brand for me and this is the first Sation polish that I've tried. When I saw the first swatches of Sation's Class of Sation collection, I knew I just had to have some of those awesome glitters. I recently made an order from Trans Design and when I noticed that they had these new Sation polishes I decided to fit two of these glitters to my order. But it was sooooo hard to decide which two to get. I finally ended up picking this Track Starlet and also Band Beauty and they both are really pretty, so I'm glad I have them!

There are quite many golden glitters out there that are kind of like this, but what makes Track Starlet special is the little red glitter among the golden ones. I think the red glitter gives this a nice extra something.


Like I said, I used China Glaze Desert Sun as my base color under the glitter and here it is by its own:
When I first saw this polish in China Glaze press release I tought I would never get it, but after a while I just decided I should give it a try and I'm glad I did, because I quite like it. And I certainly don't have anything quite like it my stash.


Nail Tek Foundation II
China Glaze Desert Sun 2 coats
Sation Track Starlet 1 coat
INM Out the Door Fast Drying Top Coat

0 comments:

a-england Saint George and Dragon

I wanted to wear a-england Saint George and Dragon again, so I did a mani with both of them.

This is two coats of Saint George on my index and middle finger nails and two coats of Dragon on my ring and pinky finger nails. I think these two suit quite well together and I thought this was an easy way to wear them both. I painted my right hand with the colors opposite way, Dragon on my index middle finger nails and so on.

Can you believe these two, they are so gorgeous! The holo effect isn't so strong in these as in some other polishes, but it's still there. I just love both of these!


Orly Bonder
a-england Saint George and Dragon two coats
Seche Vite

0 comments: