If there's one thing I love it's neon nail polish. I really don't think there's much better ... except maybe neon splatter nails!!!
Splatter nails create such a unique look for your nails. You'll never get the same design twice even if you use the same polishes. And, all told, they're really not that hard to do. All you need is polish, a piece of paper, some tape (for easier cleanup), and a straw. Tape around your nails, drop some polish onto a piece of paper, dip your straw into the polish and blow in one hard puff over your nail. Be sure to keep the piece of paper under your hand so you don't ruin your workstation. This may not always get a splatter but just keep trying until your straw picks up enough polish.
My problem with splatter nails? I don't know when to quit! I just keep adding more and more splatters until my base polish is practically covered and the splatters are everywhere. I think I managed to reign myself in more than usual with this splatter, but there's still a lot of them.
My right hand is less covered with splatter, but I did have a major drip on my middle finger and couldn't manage to get very many on my ring finger. Also, I somehow managed to smudge the polish on my index nail. I have no idea how. One moment it was fine and then next it was bunched. There was simply no fixing it.
And here you can see the thumb of my right hand. It has a good splatter pattern and managed to get a good splatter of each color.
Overall, I think this turned out really great. I definitely want to do more neon splatter nails. I'm thinking Sun Worshiper would make an amazing base color.
Polishes Used
Color Club - Yell-Oh!
Color Club - Mrs. Robinson
Funky Fingers - Kingston
China Glaze - Sun Worshiper
... or maybe not so simple glitter.
This post is coming to you from the vault (or what I call my forgotten nail folder) since my nails are still painted Ocean Sunrise. They're holding up very well, showing simple tip wear on only one finger. Amazing! So, I decided to keep them until they start chipping.
With this in mind, I decided to post my before Easter mani. This mani was painted for one day of wear; between Paint Splatter to Hoppy Easter. I didn't want something I wouldn't want to take off so it had to be kept simple. This is what I came up with.
I used the polish that is quickly becoming a favorite of my collection. Maybe not my all time favorite but definitely within the top 10 ... maybe even the top 5 of the polishes I own. This is 2 coats of Wet n Wild Megalast in 'I Need a Refresh-Mint' with one coat of Funky Fingers 'Flashing Lights'.
Flashing Lights is a blue (or blue/green) based holographic glitter that I picked up at Five Below last month. The glitter is always catching the light and shifting colors. My two-year-old niece was fascinated by this mani and wouldn't let my fingers go for nearly five minutes, insisting she wanted her nails to look like mine. It must be something great if it can keep a kid that age distracted for any length of time!
What glitter post is complete without a blurred photo? This is just one coat of holo polish; you could certainly get a more eye-catching look with more glitter. However, I tried to keep the glitter (and thus the cleanup) to a minimum.
I thought I would take a moment and add a picture of the bottle so you can see what I mean when I call it a blue based holo. This is Flashing Lights compared to Sand & Stilettos, a purple based holo.
Hey guys! I hope everyone is doing great today. It's looking pretty nice here. The sun is shining, there's an Easter egg hunt later, and the kids are off school. Not my kids though since I don't have any—they're my sister's kids and it will be great to watch them hunt for Easter eggs. :)
The mani I have for you today is one I've been dying to try since I did The Hunger Games nails. Paint splatter!! I thought of doing pastels for Easter but I've fallen in love with the Funky Fingers neon orange color, Kingston, and decided to work around that instead. Wanting to give it a chance to really shine I used blue, purple, and yellow with the orange.
This post is very image heavy since I took pictures of nearly every stage of doing these nails. So, prepare yourselves. :p
The first part of doing these nails (after painting your base color) is taping your fingers. This will make cleanup much easier. This is 3 coats of LA Colors white. I've tried many whites (both cheap and expensive) and none have held up as well as this white. The whites I use chip within the day but LA Colors held up for multiple days and are only showing slight wear and tear to the tips. I definitely recommend hunting this polish out if you have trouble finding a good white because not only does it hold up well, I found it at my local Dollar Store.
The next step is gathering your supplies (polish and a regular old straw. I used a bendy one and it worked perfectly) and getting your station set up. You'll need something to put under your fingers while you 'splatter' or you'll end up with this mess all over your work station instead of on a piece of paper. This is just the mess from one hand. I switched papers for my right hand.
Even with the tape your nails will need some cleanup.
Direct Sunlight
Shade
Right Hand
I had trouble getting splatter on my right hand. It came out of the straw in blobs or small sprays, but in all I think it actually turned out better. I'll have to remember that less splatter looks more realistic when I do this again.
So, what do you guys think? Ready to try splatter nails? If you are, I recommend using your cheaper polishes. Splatter nails waste a good bit of polish, both with the actual splatter and with the large drops of polish you dip your straw into.
Polish Used
- Borghese - Brillante
- LA Colors - BCC 561 (White)
- Funky Fingers - Kingston
- Sally Hansen - Blue Me Away!
- Sally Hansen - Mellow Yellow
- NYC - Prince Street
- Sally Hansen - Insta-Dri
Hello my lovely readers! I feel like I'm really late with my posting. It's been such a busy week and I've gone through my polish pretty quickly. I have this post and two others, and the polish I have on now is starting to show wear on the tips. But that just means more posts for you to read!
That said, I'm so excited! This blog has hit 20 (+1) followers. I never expected so many of you!! In honor of that number I've decided to do a giveaway. I already have the prizes ... bought by me with my limited funds—I just hope they're good enough to show the depths of my appreciation. Now I just have to figure out how hosting a giveaway works. I'll have it put together and posted soon!! I have high hopes to one day have great prizes, random giveaways, and lots more for milestone follower numbers. Be on the lookout in the next few days for your chance to enter.
Now, onto the post. This was inspired by a Pinterest pin. I clicked the wrong thing before I could repin and the page reloaded. Sadly, I can't for the life of me find the picture again. I did a few searches but nothing. However, a google search brought up Reverse Rockabilly by The Daily Nail. The picture isn't the one I saw on Pinterest but the design is near exact. I feel I have to give credit somewhere so it goes to The Daily Nail. :)
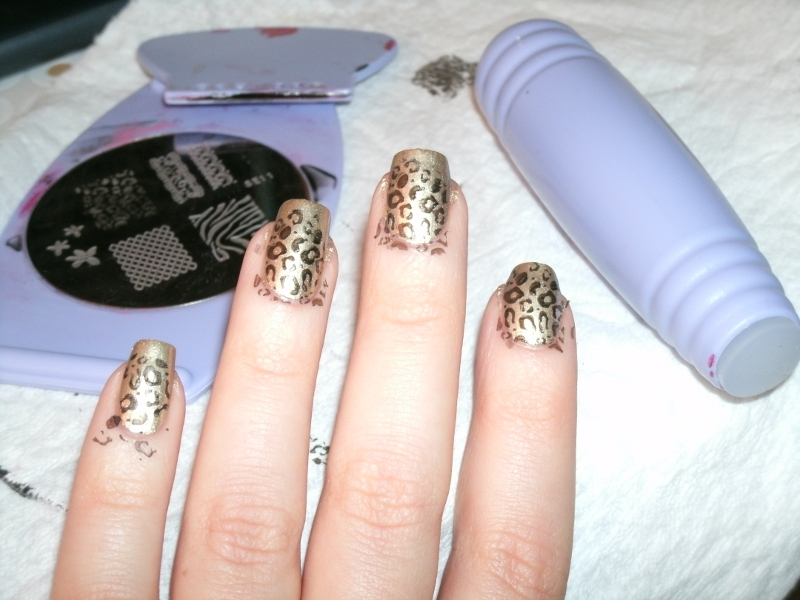
I only managed to get one good picture of these nails completed. I have really got to finish making my light-box; I hate my pictures being at the mercy of Mother Nature. I did manage to get two pictures while I was working on them though that I'm willing to share.
Look at that mess! Not so pretty while I work on them, are they?
I was feeling extremely shaky the day I did these; so much so that I actually dropped my nail polish brush/cap and splattered gold all over my keyboard. That has certainly never happened before. I just didn't trust myself with a nail art brush; I was already imagining the absolute horror if I attempted it, so I just used my stamper and the leopard print image plate (Salon Express plate SE11). I'm really beginning to love stamping. I prefer to hand paint but it's great for those days when my hands are shaking too badly for detail work.
Here they are before I added the pearls. I went shopping with my sister that day and we got some sunlight while driving. Of course, I spent no time enjoying this little ray of sunshine. I used this break in cloud cover simply for picture taking. I have such a one track mind! Don't you love it? :)
Polish Used
Funky Fingers - Platinum Record
China Glaze - Poinsettia
LA Colors - BCC 585 (Black)
*Pearls bought from the Born Pretty Store. Definitely worth at least a browse through.
- Also, check out the new additions I added today. There are now Facebook like buttons below every post and if you look to the top left you will now see buttons to both follow me on Twitter and one to like my Facebook page. You can also look up at the top and find the new page additions—About Me, Contact Me, and my Disclosure. Take a moment to read them if you have time. :)






.jpg)


.png)


